Admit it, there have been times when tossing a piece of clothing seemed like a better choice than trying to repair a broken button! Most guys aren’t excited about sitting down with a needle and thread to re-attach a lost button, and many guys would rather just replace something than try to repair it. What they don’t know is that learning how to sew buttons on to a shirt, coat, jacket, or pair of pants is actually really simple!
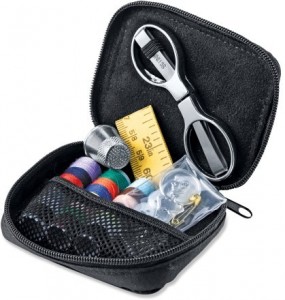
In order to tackle all of life’s rips and tears, invest in a simple sewing kit that includes scissors, high quality thread in various colors, needles in various sizes, a thimble, and a needle threader. Kits can cost as little as $2, so this isn’t a big investment at all!
Here’s our to-the-point DIY way to sew on buttons!
[box]
- Get your sewing kit, original or replacement button, and a good light source. Thread is small, so you’ll want to make sure that you can see your work clearly and that you’re comfortable while you’re doing the work.
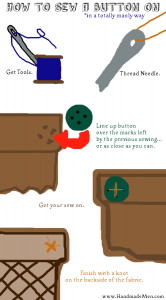
- Thread your needle with a color that either matches the cloth of the garment or compliments it in an interesting way. Pull the thread about24″ through the eye of the needle. Then, double up the thread so that the middle of the thread is in the eye of the needle and you have two 24″ lengths coming from the needle. Trim.
- Look at the fabric and find where the button was originally sitting. You’ll be able to locate the holes left by the original sew job. Carefully run the needle from the back side of the fabric towards the front – that is, from the opposite side of where the button sits to the side where the button sits. Thread through one of the holes previously used. Pull until there’s about 6″ of thread behind and 18″ of thread in front of the fabric.
- Thread one of the button holes over the needle and down against the fabric – it doesn’t matter which hole you choose.
- Position the button so that it’s even and centered with where it should be. Check twice, sew once!
- Without pulling the thread all the way through (leave 6″ behind the fabric), run the needle through the opposite button hole back through the fabric. You’ll now have one loop over your button and both the needle and the loose end of your thread on the backside of the fabric.
- Now, thread up through one of the un-threaded holes. Thread down through the last remaining hole. You should now have a thread in all 4 button holes.
- In an ‘X’ pattern, run the thread un and down through opposing holes 3 times to get a nice thick ‘X’ pattern over the button suing all holes equally.
- When done, run the needle through the fabric or the button so that it is in limbo between them. You’ll then wrap the remaining thread around the threads between the button and the fabric a couple of times for added strength. When it’s nice and strong, finish the thread so that the needle end and the loose end are next to one another on the back of the fabric.
- Tie these two ends together several times using string knots.
- Test your button and make sure it all works.
- Congrats!
[/box]
Manly Fact:
A tailor and haberdasher are traditionally male professions. Men’s outfitters were traditionally men, and they were expert in creating tailored suits, shirts, making repairs, handling fabrics, building zippers, making buttons, and creating men’s clothing designs. Learn more <here>.
Sew, now you know!


OK, I just HAVE to sy this:
The above mentioned “Manly Fact” is absolutely true.
I just wish that the average American Male could experience what it is like to shop for Men’s Clothes in Europe.!
Just to give you an idea: The men’s shirt department at Harrod’s in London is bigger than most major department stores’ whole Men’s clothing section here in the states.
..And the sales personnel are experts, they know all about Men’s fashions, even if you don’t.
They have to complete a minimum 4 years of formal study before they can sell anything.
Ah, to walk down Saville Row in London with it’s miles of nothing but famous men’s shops. !!
ADK
P.S. and this is not just for the rich, everyday working stiffs shop there routinely.